If you’ve ever recorded something thinking that the timing was perfect, only to find that on playback its all a bit off. Well it could be you need to adjust the recording latency offset in REAPER’s preferences.
Whenever you record from an audio input, REAPER uses the audio device drivers information about latency to automatically put what you recorded into time. It’s usually pretty close but if the driver isn’t telling reaper the right thing, the timing will be slightly off.
In this video I’ll show you a simple way to detect and correct any additional latency your interface isn’t reporting.
First let’s look at reaper audio device preferences
If you’re on windows you’ll want to use an ASIO driver when recording. In most cases you’ll have the lowest latency and best performance, and it will report the latency to reaper. On a Mac there’s the core audio driver for whatever audio interface you have, and you’ll just want to make sure you have that up to date.
While we’re here, set the latency to whatever you normally use for recording. 64, and 128 are common low latency block sizes.
Now let’s look at the recording preferences
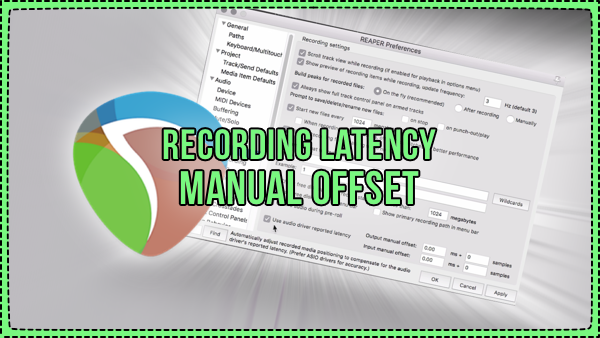
Make sure this box is checked at the bottom, “use Audio driver reported latency”. Unless you want to manually correct the latency completely. If you’ve never had this option enabled, this will probably make a huge difference.
Without this we’d never be able to record with direct monitoring and get anything close to in time with the project.
And down here we also have the 4 optional manual offsets for output and input in milliseconds or samples.
You can set either, I feel like input makes more sense to adjust, and adjusting by samples will be more accurate.
How do we know how many samples to add here?
By setting up a loopback test. We’re going to connect a cable from the output to an input and using a test signal determine how many samples of offset is needed.
I was going to show you how to make the test signal, but I realized there’s an easier way using the ReaInsert plugin.
Ok close the preferences.
Turn off your speakers, and unplug headphones. We’ll be sending a full scale signal out and the wiring is potentially a feedback loop so it could get loud enough to break something.
I’m going to show you on this basic audio interface the Focusrite Scarlett 2i2, but really it’s the same on any device.
You’re going to need a TRS cable, connect it to one of the the outputs, and the other end to one of the line inputs.
Make sure if there’s a switch that its line not instrument or hi-z. And very importantly, if there’s a direct monitor switch, turn that off. If your Audio interface has a software mixer, make sure that the inputs are muted. We really don’t want a feedback loop.
Then we’re turning the volume on the interface up full.
I’m doing the same setup on my Arturia Audio Fuse, using output 3 and input 3, and I’ve made sure that input 3 is not monitoring and the main out is all the way up. I just couldn’t get the camera and lights in a good place to film that.
Back to reaper we need 1 track, we’ll alt-click the routing button to make sure it doesn’t go to the outputs.
Then we’ll add the ReaInsert plugin.
Set the output to your output, and the input to the input, the same as you wired it, with the other output and input set to none. then press ping detect. A signal will go through the loop and tell you the delay compensation in samples.
Now we just take this number and add that to the input offset adjustment. And that’s it. We can press ping detect again in ReaInsert and now see 0 samples of additional latency.
Couple more things to note before we wrap this up. Any time you change the sample rate or audio device block size, technically this number will change. I feel like in most situations it will still be close enough, and you can optimize this setting for your usual recording block size.
If you normally monitor through a digital connection like S/PDIF into a monitor controller, you’ll want to do the loopback with the S/PDIF cable instead of analog.
And the last thing to mention is that this only applies to signals coming through the inputs. And by that I mean that if you route from one track to another and record the output, the manual latency offset isn’t needed and is not used.
Leave a Reply