REAPER 101 is a series of short articles to help beginners get started with REAPER quickly.
This tutorial will explain the various buttons and options of the Track Control Panel.
The Track Control Panel, often shortened to TCP, is the section in the arrange view for each track in the project. All the essential controls you find in the mixer are crammed into this section to give you quick access without needing to open the mixer window.

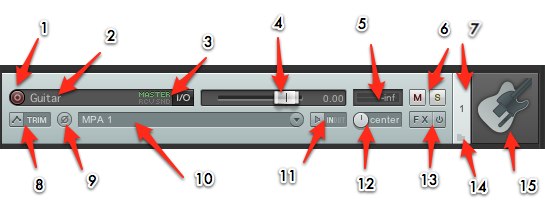
The image above identifies 15 features of the TCP with the default Reaper 4 theme. It may look different depending on the track size or width or the theme and layouts in use.
- Record Enable – click this if you want to record on this track
- Track Name – give your track a name to keep your project and files organized
- I/O routing – opens this pop out window to configure routing in and out of the track
- Volume Fader – makes the audio on this track louder or quieter
- Metering – shows MIDI and audio activity for input and playback
- Mute and solo – make this track silent or all other tracks silent
- Track Number – tracks are numbered as the appear in the project from top to bottom. The number changes if you move a track
- Envelopes/Automation – menu for automation modes and related options
- Polarity/Phase invert – flips the audio upside down
- Input selector – select the analog, digital or MIDI input for the track
- Record input monitoring – listen to the input signal or not
- Panning – output the audio on this track on channel 1 (left output/speaker), channel 2 (right), both (center) or anywhere in between
- Track FX chain and bypass – add and edit effects for the track; bypass all fx
- Folder – make this track a folder, or last track of several in a folder
- Track icon (optional) – you can insert an image to identify tracks, this is normally hidden
TCP height and width can be adjusted by dragging the bottom or right edge.
Most of these features/buttons/menus are also found in the Mixer Control Panel, but we will focus on the MCP in another article.
Comments
24 responses to “REAPER 101: The Track Control Panel”
[…] is the part of REAPER where you mix your song. While offering the same basic controls as the TCP [click here for REAPER 101: Track Control Panel], the mixer has everything laid out in an a large uncluttered way. The REAPER resembles the layout […]
When recording a track, if you have the phase button enabled, does it record the track with the phase flipped?
nope. panning, volume, effects and the phase/polarity are in the monitoring chain, meaning after recording.
Is there a way to float the current active track to get a single fader like the master track float view so you can see fx and a larger meter and fader? All this of course when using a view like Track Control Panel View only with the mixer hidden.
There’s a trick to dock the mixer on left side and shrink it to show only one track. When you select different tracks it automatically updates there too. It’s similar to an inspector view found in Cubase and logic
Thanks, another screenset created.
My volume fader from the track is missing. What should I do? How should I turn it on please?
the screenshot above is of Default 4 theme. Default 5 has a knob in about the same spot.
So i figured out how to create a folder and i have 7 drum tracks recording on the one folder track,but the input on my folder only has analog 1analog 2, etc etc… So it just records the kick drum twice since i have no choice but to select one of the analog channels and obviously i choose analog 1 when really i want input None. Please someone tell me how to do this as the instructional video on reaper tv is outdated to the way things are listed in input now.
You don’t need to arm the the parent folder track if you don’t want to. just arm the tracks you want to record and select the input that corresponds to your interface on each track. The input listing corresponds to your audio interface, also you can look at the list of the available inputs on the device you have selected in >options – >preferences – >device.
Let me rephrase my previous question. What I want to do is record from the parent track. I want to be able to do multiple passes of drums in lanes and only have to split/edit from the one parent track,but the parent track has the input to set and if i leave it analog 1for example it records everything to the parent track yet records the kick,analog 1, twice now,and so the parent track is useless to me.alao moving the parent folder changes my order of my tascam 16×08 so the kick becomes track two and wont recieve from my kick mic.
Change your track channels from 2 to 8, then you’ll see options for multi-channel inputs.
No need to make this track a folder.
So i should move all my xlr cables one over? So plug in the kick mic to the 2nd input of my tascam etc?
not what I meant. Click the tracks IO/routing button. Track channels = 2. Change that to 8.
This panel is so small is there a place to change it so it is actually readable/larger?
Do I need a audio interface with more than two inputs if I already have a 24 channel mixer board? Could I just put my two main sends to the 2 audio interface inputs and then send that to the computer?
Or do I need a larger interface, because the computer won’t know where the individual tracks are coming from because there is more than two inputs on the audio interface?
My arrangement window that the shoes the track recording disappeared can anyone help me find it
Please help. I have looked everywhere for auto pause. I have 20 segments within my track, is there any way to play a segment then have the transport stop automatically at the end of the segment, then press spacebar to continue.
Mark each section with a region, then add an action marker at the end of each region.
Insert a marker and name it “!1016 41802”
that will stop transport and move the cursor to the next region start
SWS extension is required, info here http://www.sws-extension.org/markeractions.php
all my control panel has been disappeared.
track control panel, main control panel.
could you please help?
anyone
try double clicking on the left edge of the window. the cursor should change shape when in the right spot.
I’m new to this software, and although I have all of the other transport channels set properly, transport channel 2 is playing through both transport channels 1 and 2, and transport channel 1 is not outputting at all. What am I doing wrong?
The TCP on the bottom side of arrange is gone. how do I restore it? Please help
Just found out. Ctrl+m