In this video I’m sharing some of the things I learned recently about modifying the REAPER 6 theme. My notes and links to more resources are in the blog below.
02:36 – Comparing Default 6 to my R6 Reaperblog theme
03:56 – Basic Theme Adjustments
05:45 – Unpacking the theme
08:09 – Theme Images Folder
10:17 – Reloading the theme
11:06 – Media item volume knob
13:05 – Toolbar button borders
16:39 – Custom track meters
21:36 – rtconfig.txt
23:01 – Transport buttons
29:42 – TCP Button Order
32:47 – The Mixer
Basic Adjustments
There are two ways to modify the REAPER 6 theme from inside reaper. First there is the new theme adjuster window. Use this to configure the name width, folder indents, and hiding of buttons in the TCP, MCP and transport. Once you make your custom theme you might find the menu option is disabled, but you should still be able to open it from the action list.
After adjusting the theme with this script the settings should be written into a file called “reaper-themeconfig.ini”
The second place to make changes is in the Theme Development Tweaker window. You’ll also find this in the action list. You can adjust many of the theme colors in here. Some of these do not override what’s been written into the theme settings file.
We’ll have to come back to this window in a bit.
Unpacking the theme
Let’s go over to the colorthemes folder and duplicate the default 6 theme (Default_6.0.ReaperThemeZip), rename to change the file extension to .zip, and confirm.Now we can unpack this zip file to access all the theme image files.
If the folder has “unpacked” suffix or anything else you can rename it. The theme and the folder of images should have the same name.
Let’s quickly go back to REAPER and load the custom theme. It’s going to look very broken at this point because the image folder changed. We just have to go back to the theme tweak window to pick the images folder, then save again. It should look exactly the same as the default 6 theme again.
Theme Images Folder
Back to the theme folder.
This is a HiDPI theme so there are 3 image folders. The main folder, then the 150 and 200 folders for higher res images.
My main monitor is a MacBook Pro Retina screen, so it’s HiDPI, but my second monitor is an older Dell and standard DPI. That means if I want to modify an image I should probably do it in both the main folder and 200 folder. Not all theme files will be in all 3 folders. If something isn’t in the 200 folder then it will fall back on the standard folder.
If you’re not sure which folder the theme is using for files, try renaming the 200 folder and see if that totally breaks it.
Reloading the theme
Each time we change something in the theme we have to reload it in reaper to see the changes.
You can do this in several ways:
– Press the “reload images” button in the Theme Development window
– run “Script: Lokasenna_Refresh current theme.lua”
– switch to another theme and back,
– using the SWS Resources window, if you have that set up.
Editing Media Item Volume knob
I don’t like the way the item volume knobs look in the default 6 theme. They stand out too much and distract me. For any file I modified I added zz to the file name of the original so I can easily find and revert. I opened “zz_item_volknob.png” in Pixelmator Pro and for the 3 knob states changed them all to be the same. Then filled in the center with the same green hue as the other item icons. It fits in with the track much better.
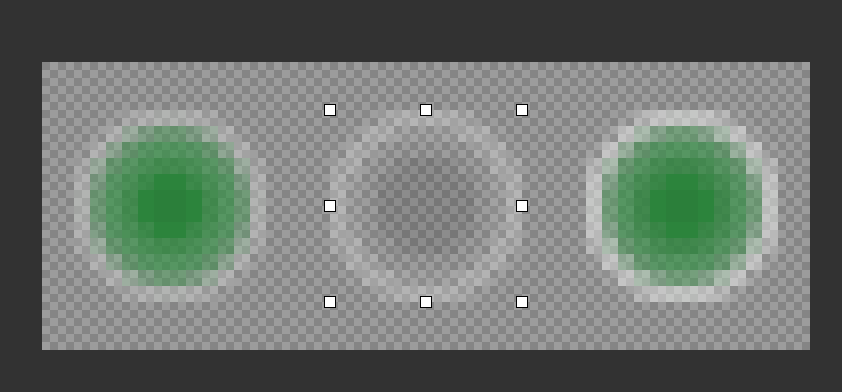
A lot of the images in the theme will be a 3-slice image format with normal, mouseover, and pressed versions of the button. Some of the buttons have two files like “transport_play.png” and “transport_play_on.png”. And some are a special overlay style like “track_solo_off_ol.png”.
Toolbar Button Borders
Let’s fix the toolbar buttons
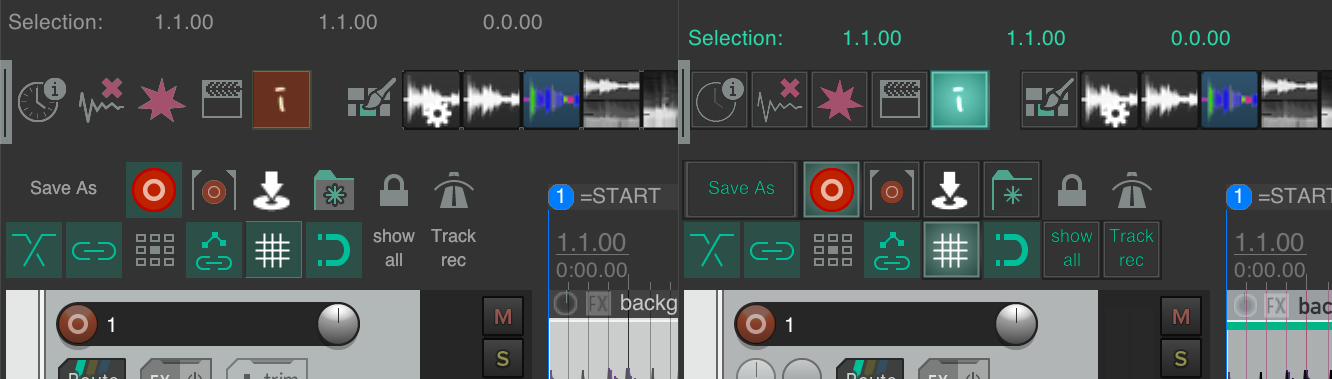
The default theme has no border around buttons or overlay, so they don’t really look like buttons unless they’re pressed. If you look at the buttons in v5 default and pretty much every other theme you’ll see there’s a different color, a border, and highlights that make them stand out.
toolbar_blank.png is used as the background of the button under whatever icon or text you add.If you want a border, this is the one to use.
composite_toolbar_overlay.png isn’t used in this theme but was used in older themes for a shadow and highlight effect on all toolbar buttons.
You may notice that some toolbar buttons don’t get the border, that’s because specific toolbar buttons in the theme folder will override the generic ones that are in the data/toolbar icons folder. The lock and metronome buttons on the main toolbar have custom icons in the theme folder. So be prepared to modify those as well if you want a completely unified look.
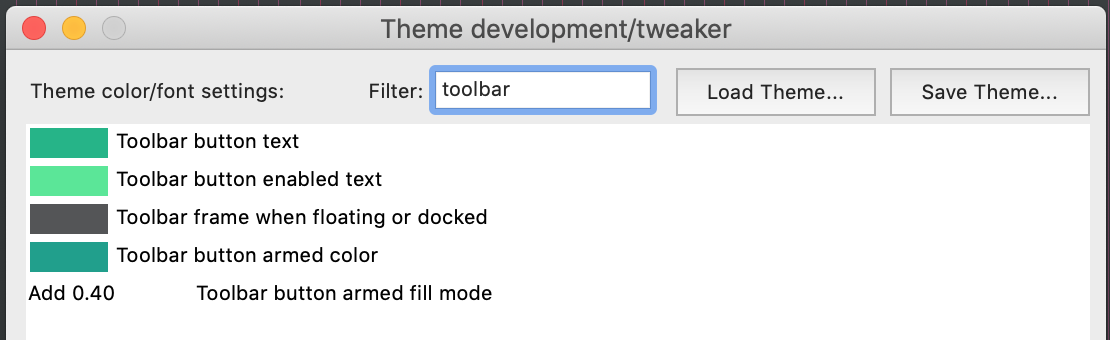
The other parts of the appearance of toolbar buttons is done in the theme tweaker. “Toolbar button text” and “toolbar button text enabled” is used for your text icons. “Toolbar button armed color” and “Toolbar button armed fill mode” is used when you right-click a button. I like Add mode with alpha of 0.4
Custom Track Meters
Like most things in the theme there are two ways to adjust the meter colors. First is by modifying a few image files…
- meter_bg_v.png
- meter_bg_h.png
- meter_bg_mcp.png
- meter_bg_mcp.png
- meter_bg_tcp.png
- meter_bg_tcp.png
- meter_bg_tcp.png
- meter_clip_h.png
- meter_clip_v_rms2.png
- meter_clip_v.png
- meter_strip_v.png
- meter_strip_v_rms.png
- meter_strip_h.png
If you remove or renaming those images you can change the colors directly in the theme tweaker.
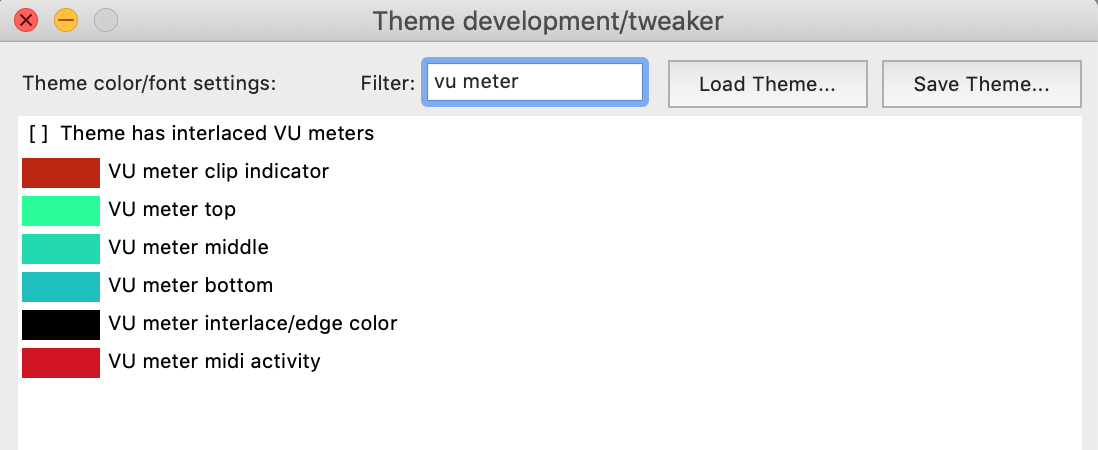
If you want complete control over the meter colors, use the meter_strip files. You can copy them from other themes or download some from the reaper stash and forum. The one I’m using is by the user Blankfiles, which I’ve adapted for horizontal and RMS versions meter_strip_v.png meter_strip_v_rms.png meter_strip_h.png
strip_v is the main one used in TCP and MCPstrip_h is used by the master track in arrange viewstrip_v_rms is used by the master track in mixer if RMS is enabled
I also modified meter_clip_h.png and meter_clip_v.png for the clip indicators
Here’s where the real pain begins
rtconfig.txt
“rtconfig.txt” contains all the code that connects the theme images and colors and functions to make it work. This is not something that you can learn in an afternoon. This is something I still feel pretty much hopeless trying to figure out.
Luckily I’m not trying to make big changes so I’ve been able to use a lot of trial and error to get by. Most of the documentation from version 4 and 5 should still help you if you want to dig into what White Tie has written.
The top section has some global settings. You probably won’t want to change any of these, although I will point out “tcp_heights” is where you would change the heights of your child tracks when collapsed in a folder.
Transport buttons
Jump down to the Transport section
look for “; draw content in sec_buttons”
I want to hide the rewind and forward buttons for the layoutI’m commenting out the line “set trans.rew” and “set trans.fwd” using a semicolon.
I can add a semicolon to the start of any lines to make it a comment, and prevent it from being used.
Things will probably be weird if we save and reload the theme now.
A ton of stuff in the theme file uses the position of some other element as their anchor point, that’s what we see here
[trans.rew sec_buttons]
If we hide the rewind button, and then use it’s position for the next element things are going to look wrong. We need to change the anchor for the next visible button to what the rewind was using originally.
[sec_buttons sec_buttons]
Basically we define the position of one of the buttons in the Transport, then make all the other buttons position themselves after.
But things are still also control by the section labeled “; Set absolute sizes…”
When you combine the absolute sizes, plus the relative position, plus scaling for different DPIs, and different layout presets… none of this is very straightforward, but not impossible.
Transport Images
Once you start moving the transport buttons around you’ll have to edit them all to adjust the drop shadows and anything else that looks out of place.
Don’t forget to edit all versions of the transport buttons. Its easiest to edit the 200 file and then export pngs in 3 sizes.
Track controls order
The TCP section of rtconfig starts at line 150 and goes to 640. I’m not going to go through most of this stuff, just the layouts section.
Stuff in the TCP can fairly easily be rearranged just by changing the order in the “then” section. This is actually a bit easier than editing the Transport section.
Line 413 is the start of Layout A. The layout has the pan as one of the last visible controls.
In the “then” section I’m going to simply cut and paste to change the order, and put the pan right after the volume. I going to repeat this change on all the other layout A scaled versions so I know it will look the same on both of my screens.
And there we go, the pan knob is now beside the volume.
You can do some other things like putting the routing button beside the record enable, add some padding, but it will look a bit wrong unless you customize the images.
Mixer controls order
I would love to get the routing button between the fx and the panning, but I can’t make any sense of the mixer section of rtconfig. I’ll have come back to this another time.
So that’s where I’m at with learning to edit the REAPER theme. I’ve done a lot but I’m still stuck on several things.
Hope this has been helpful and interesting. It’s been exhausting!
I have so much respect now for the “real” themers that put in countless hours and share the them for free in the end.
Links and resources
White Tie’s WALTER themer’s guide (PDF)
REAPER Stash – download complete themes, meter strips and other assets
Comments
8 responses to “Customizing the REAPER 6 Theme”
Jon, I just want to say thanks. Adjusting to the new R6 theme features and DPI capabilities was a lot of work for me too, but I would easily have spent much more time had it not been for your video.
Thanks for showing how themes can be unpacked and thanks for discussing the composite overlay file and the blank toolbar.png. This helped me to migrate all my icons to the R6 theme and to get them to have borders and look and work the way I like.
Keep up the good work!
Thanks again,
Mark
Thanks for the comment Mark! I got a good response to this theme editing video and I’ve learned a bunch since posting it. I’ll have another on the topic I’m sure.
I would love to have your theme, Jon. (I’d be willing to pay for it)
When using the Custom Default_6 theme, the theme adjuster is not available. Is this to be expected or did I miss something?
the theme adjuster script is accessible from the action list.
John. I love the modifications you are making to the default theme! Thanks for sharing all that you have learned. Hope to be able to use your custom theme when it comes out.
Thanks for this. I was hoping it would tell me how to use a different meter (the Youlean plugin) on the master. Is there a resource that will show me how to change the meter used? Thanks.
Maybe a dumb question but can you save your theme and let some of our fans (like me) download it and use it? If you want payment that is fine too.